
Bow tuning is an important part of ensuring accuracy in your shooting, and something every archer should learn. In this first part of our guide to bow tuning, we’ll cover the
Introduction
It is important to be aware that successful tuning can only be achieved by using a properly spined arrow shaft. It is highly recommended that when you purchase arrows, these are correct for your set-up. Any problems due to an improperly spined shaft will become evident during tuning. Before starting any bow tuning be sure that your arrow shafts are straight, are properly fletched, and have perfectly aligned nocks
Choose your bowstyle
Tuning procedures for the three most popular shooting setups are described and abbreviated throughout these guides as follows:
- recurve bows, using finger release (RF)
- compound bows, using finger release (CF)
- compound bows, using a release aid (CR)
You will notice that some of the techniques of bow tuning apply to all types of bow setups and others apply to just one or two types. When separate tuning procedures are required for specific setups, find your setup within the topic and follow those specialised instructions.
Install all components
Before you start any bow tuning procedures, be sure to install all accessories on your bow, i.e., the correct bowstring, bow sight, stabilizers, arrow rest, pressure button, etc. In other words, install all the items you intend to use when shooting. Any adjustments made to the bow or changes in bow components can affect the tune of your equipment. When tuning, it is very important to change only one variable at a time.
Preliminary set-up
The first phase in achieving well-tuned equipment is good preliminary equipment setup. If the initial setup is done correctly, bow tuning should be an easy process. By following the bow setup guidelines in the initial preparation of your equipment, you can eliminate most or all of the possible disturbances which cause tuning problems, including false tuning indicators. A false tuning indicator would have a high nocking point indication when the problem is actually poor clearance.
Install the nocking point
Ensure you install a moveable nocking point on the bowstring for the purposes of tuning. Clamp-on types are ideal for this. Position the nocking point on the bowstring about 1/2 inch (1.3 cm) above square for RF and CF and approximately 1/4 inch (0.63 cm) above square for CR. See Fig. 1.

Find the limb centres
In order to have a reference point from which to adjust the arrow’s left/right position on the bow, you will need to find and mark the exact centre of the limbs on a recurve bow, or what is termed the “balanced limb centre” on a compound bow.
Recurve bows
To find the limb centre for recurve bows, place a piece of masking tape across the inside of each limb a few inches from the riser. With an ink pen, make a small vertical mark on the tape in the exact centre of each limb.
Compound bows
To find the balanced limb centre location for the preliminary setup of your compound bow, place a piece of masking tape across the inside of each limb a few inches from the riser. Accurately measure the width of the limb (at the tape) and place a very small pen (or pencil) mark on the tape in the exact centre of each limb.
Next, measure 3/16 inches (4.8 mm) to the left of the mark (for right-handed archers) and make a larger vertical mark on the tape. (Left-handed archers place a larger mark 3/16 inches (4.8 mm) to the right of the limb centre mark.) This second mark will be used for arrow centring. This procedure is done to compensate for the amount the eccentric wheel or cam is offset from the actual centre of the limb. The 3/16 inches (4.8 mm) measurement is an average “offset” difference for most compound bows and does not need to be a precise measurement in the preliminary setup stage, as you will locate the true balanced limb centre when performing the fine-tuning procedures.
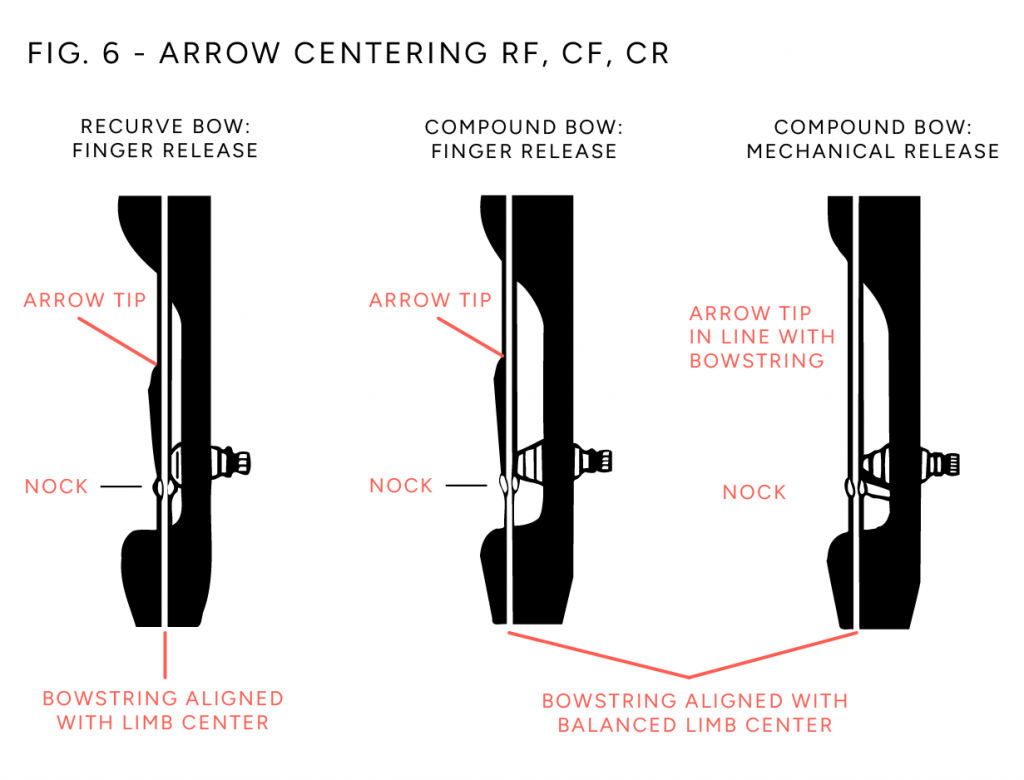
Centring the arrow
The objective of arrow centring is to have the arrow leave the ‘theoretical’ or ‘balanced’ limb centre of the bow. In actuality, it’s the two nodes of the arrow shaft that should leave the centre of the bow in direct alignment with the target. Releasing the string with fingers creates a horizontal bending motion within the arrow. Releasing the string with a release aid causes a slight up/down bending motion instead. Because of this, the arrows must be positioned differently for each release style.
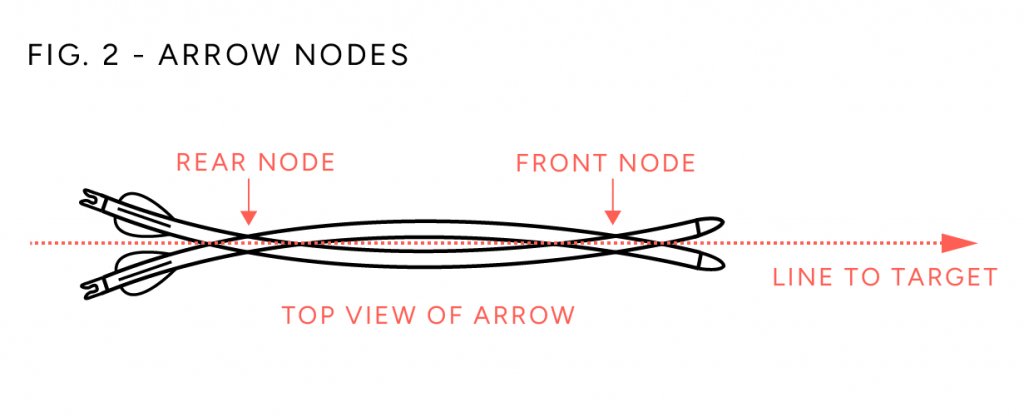
Arrow nodes
As an arrow oscillates, the arrow nodes should remain in direct alignment with the target. The diagram below illustrates the front and rear node positions of the arrow. The front node is usually closer to the front end of the arrow than the rear node is to the nock end. This is due to the mass weight of the point – nodes will always be located closer to the heavier mass.
Adjust the arrow left/right position
Adjust the horizontal (in/out) position of the pressure button or arrow rest assembly so that the tip (centre) of the arrow point is correctly aligned with the type of equipment you shoot.
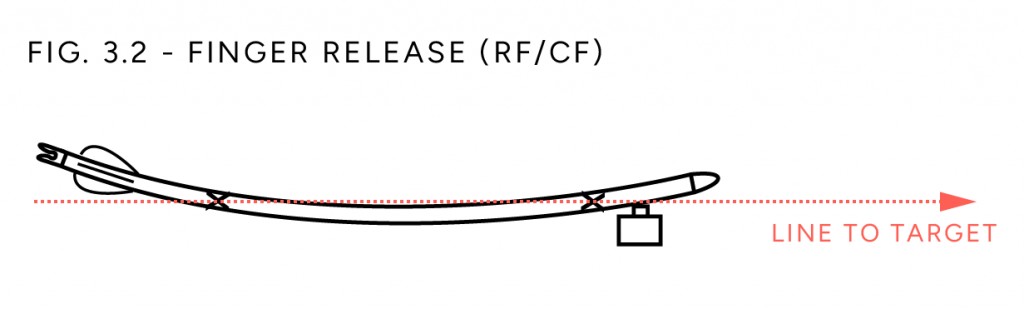
With finger release (RF, CF)
Align the ‘tip’ of the arrow point 1/16″ to 1/8″ (1.6-3.2 mm) or less outside the bowstring with the bowstring properly centred according to Fig. 6. The arrow tip is placed slightly outside the string to provide compensation for the amount the pressure button or side loading device compresses into the bow when the arrow is released.
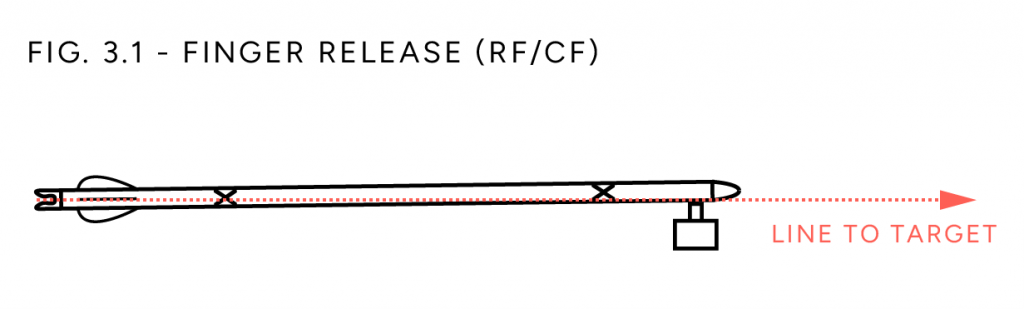
With a finger release, the arrow bends horizontally, first bending in toward the bow, then bending away from the bow, which causes the arrow shaft to leave the arrow rest. In the next bending sequence, the arrow nock disengages from the bowstring. The arrow is then on its way, freely oscillating all the way to the target. The amount of oscillation decreases as the arrow travels farther from the bow.
With mechanical release (CR)
Align the ‘tip’ of the arrow point down the centre of the bowstring. The centre line (axis) of the arrow must start out in a direct line with the bowstring when the bowstring is aligned to the balanced limb centre.
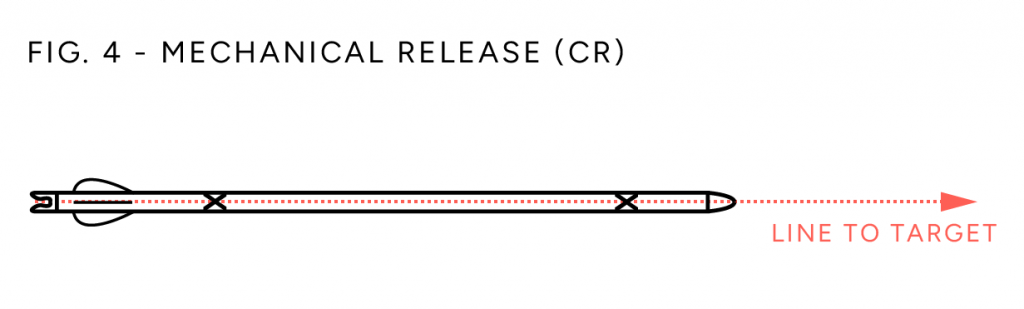
When using a release, the arrow most often bends vertically, rather than horizontally. Therefore, there is no need to compensate for any inward compression of the arrow rest or cushion plunger. Follow the bow-tuning methods in the Fine Tuning and Micro Tuning sections to find the best in/out position for your arrow shaft, which allows the arrow nodes to be in direct alignment with the target.
The diagrams in Fig. 6 indicate the correct in/out arrow position for your shooting style.
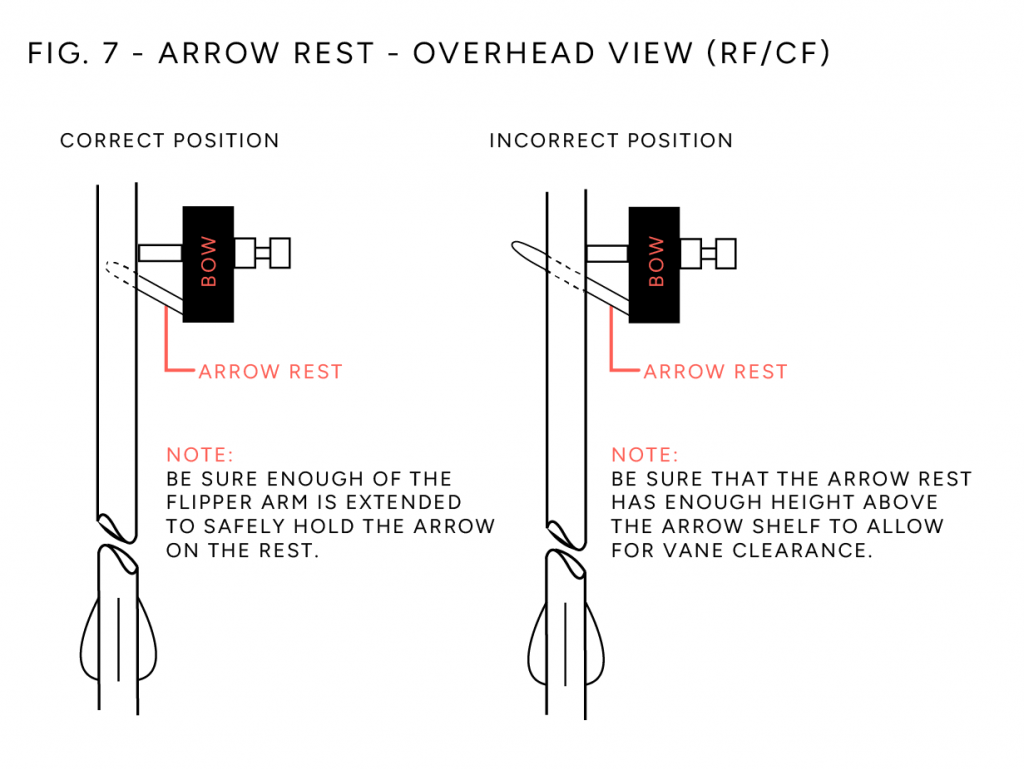
Adjust the arrow rest (recurve and compound)
The arrow rest support arm position is critical to achieving good arrow clearance.
With Finger Release (RF/CF)
Most rest setups have an adjustable arm for the arrow rest. If this adjustment is available on the rest you’re using, the arrow rest support arm should be adjusted so that it is not visible past the outside of the arrow shaft when observed from an overhead view (Fig 7.)
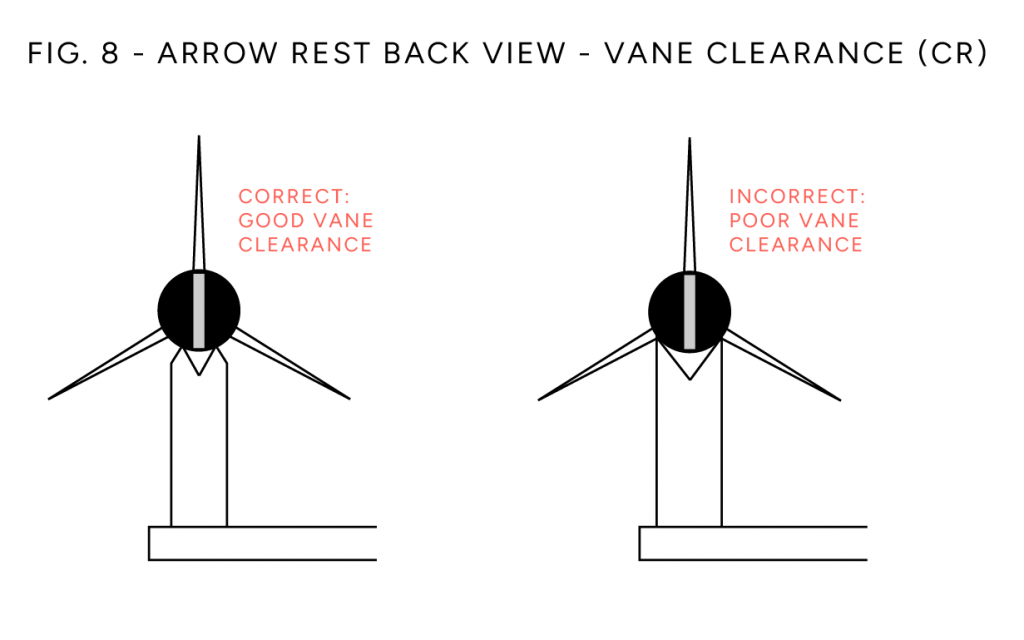
With mechanical release (CR)
On launcher-type rests, commonly used on compound bows with release aids, be sure that the arrow support arm is narrow enough to allow the two lower vanes to pass over the rest without making contact (Fig. 8.) This is very important for archers using release aids because the arrow is most often supported on the rest for its full length of forward travel. For the smaller diameter aluminium/carbon or carbon shafts with less space between vanes, it may be necessary to significantly reduce the width of the launcher blade.
Adjusting for outsert components (CR)
When using carbon arrow shafts which have externally fitted nocks it may be necessary to adjust your nocking point up slightly to allow the nock to clear the arrow rest. The nock diameter is significantly larger than the shaft diameter on these arrows. A slightly higher nocking point lifts the arrow off of the arrow rest and keeps the nock from coming in contact with it, eliminating a potential clearance problem.
Riser-mounted clickers (RF/CF)
For clicker shooters, be sure that the arrow is well supported on the rest and not held in place by the tension of the clicker only. It is important to draw the bow a few times without the clicker to make sure the arrow can be drawn and let down without the arrow falling off the arrow rest.
Align the bow-sight pin
Initially, set the sight pin on your bow sight over the centerline of the arrow shaft.
Set the pressure button
Not every type of bow setup uses a cushion plunger. Some archers use rests without a cushion plunger. For example, many tournament archers use a Springy™ rest, and some traditional archers use other styles of arrow rests that do not have side pressure tension adjustments. If your setup incorporates a cushion plunger, start with the spring tension set at medium.
Set the brace height
Recurve bows
Start with the brace height at the lower end of the manufacturer’s recommendation or use the following chart. To locate the optimum brace height for your particular bow, “twist up” the bowstring to make it shorter. This raises the brace height.
| Bow Length | Starting Brace Height |
|---|---|
| 64 inches | 8 1/4 – 8 1/2 inches (21.0 cm – 21.6 cm) |
| 66 inches | 8 3/8 – 8 5/8 inches (21.3 cm – 21.9 cm) |
| 68 inches | 8 1/2 – 8 3/4 inches (21.6 cm – 22.2 cm) |
| 70 inches | 8 5/8 – 8 7/8 inches (21.7 cm – 22.5 cm) |
All bows are different, even ones of the same make and model. Therefore, it is important to locate a brace height that fits your particular bow and shooting style. Shoot a few arrows at the suggested beginning brace height, then unstring the bow, add 3-4 twists to the bowstring and shoot again. Continue this process until the bow feels smoothest and quietest when shooting. If the bowstring is too short to allow a brace height at the lower setting, you may wish to use a slightly longer string.
If the string is too long to allow a higher brace height (and starts to knot-up from too many twists), you may wish to try a slightly shorter bowstring. There are many custom bowstring makers who produce strings to your exact specifications including length, type of material, type and color of serving, etc.
The brace height determines the specific point at which the arrow separates from the bowstring and the amount of bend the arrow has when the separation occurs. The best brace height for your recurve or compound bow is one that allows the most compatible launch position for the arrow at the end of the bow’s “power stroke.” Locating the best brace height for your bow can significantly improve arrow grouping and shooting consistency.
Compound bows
On compound bows, brace height is set by the manufacturer. Sometimes changing the brace height to a slightly higher or lower position will improve arrow flight and grouping. This can be accomplished by changing the length of the string, as described previously for recurve bows. Remember, however, that changing the brace height of a compound bow affects the draw weight and draw length of the bow
Nock to bowstring tension
The nock tension (‘snap fit’) necessary to separate the nock from the bowstring serving can be very critical, especially on light draw-weight bows (30 lbs. and under). Nock tension should be tight enough so the arrow can easily support its own weight when the arrow is hanging vertically on the bowstring (nock against the nocking point). To check this, hang your arrow vertically from the bowstring, and give the string a sharp tap with your finger on the serving about 1-2 inches (2.5-5 cm) from the arrow nock. The arrow should separate from the string. If it does not, the nock is probably too tight for most target archery. For hunting, a slightly tighter nock-to-bowstring fit is often preferred.
That is the preliminary set-up and adjustments done. Now you can move on to Part II of our guide and start your tuning process.